Saturday, August 16, 2008

Memory Layout of a C Program - Stack Wise


high high --------------
        |               |
        | Arguments and |
        |  environment  |
        |   variables   |
        |               |
        |---------------|
        |     Stack     |<--|--
        |(grow downward)|   |
        |               |   |User
        |               |   |Stack
        |               |   |Frame
        |               |   |
        | (grow upward) |   |( Mind the Gap )
        |      Heap     |<--|--
        |---------------|
        |      BSS      |<-- uninitialized static data(block started by symbol)
         |               |      long  sum[1000];
        |---------------|
        |      Data     |<-- initilized static data(int   maxcount = 99)
        |---------------|
        |      Code     |<-- text segment machine instructions

low
Stack : where automatic variables are stored, along with information that is
saved each time a function is called. Each time a function is called, the
address of where to return to and certain information about the caller's
environment, such as some of the machine registers, are saved on the stack. The
newly called function then allocates room on the stack for its automatic and
temporary variables. This is how recursive functions in C can work. Each time a
recursive function calls itself, a new stack frame is used, so one set of
variables doesn't interfere with the variables from another instance of the
function.
Text Segment: The text segment contains the actual code to be executed. It's
usually sharable, so multiple instances of a program can share the text segment
to lower memory requirements. This segment is usually marked read-only so a
program can't modify its own instructions.
Initialized Data Segment: This segment contains global variables which are
initialized by the programmer.
Uninitialized Data Segment: Also named "bss" (block started by symbol) which
was an operator used by an old assembler. This segment contains uninitialized
global variables. All variables in this segment are initialized to 0 or NULL
pointers before the program begins to execute.
The stack: The stack is a collection of stack frames which will be described in
the next section. When a new frame needs to be added (as a result of a newly
called function), the stack grows downward.
Every time a function is called, an area of memory is set aside, called a stack frame,
for the new function call. This area of memory holds some crucial information, like:
1. Storage space for all the automatic variables for the newly called function.
2. The line number of the calling function to return to when the called function
returns.
3. The arguments, or parameters, of the called function.
The heap: Most dynamic memory, whether requested via C's malloc() and friends
or C++'s new is doled out to the program from the heap. The C library also gets
dynamic memory for its own personal workspace from the heap as well. As more
memory is requested "on the fly", the heap grows upward.

Friday, August 15, 2008

BIG / LITTLE ENDIANESS - Interpreting Data

Now let's do an example with multi-byte data (finally!). Quick review: a "short int" is a 2-byte (16-bit) number, which can range from 0 - 65535 (if unsigned). Let's use it in an example:
short *s; // pointer to a short int (2 bytes)
s = 0; // point to location 0; *s is the value
So, s is a pointer to a short, and is now looking at byte location 0 (which has W). What happens when we read the value at s?
* Big endian machine: I think a short is two bytes, so I'll read them off: location s is address 0 (W, or 0x12) and locaiton s + 1 is address 1 (X, or 0x34). Since the first byte is biggest (I'm big-endian!), the number must be 256 * byte 0 + byte 1, or 256*W + X, or 0x1234. I multiplied the first byte by 256 (2^8) because I needed to shift it over 8 bits.
* Little endian machine: I don't know what Mr. Big Endian is smoking. Yeah, I agree a short is 2 bytes, and I'll read them off just like him: location s is 0x12, and location s + 1 is 0x34. But in my world, the first byte is the littlest! The value of the short is byte 0 + 256 * byte 1, or 256*X + W, or 0x3412.

Keep in mind that both machines start from location s and read memory going upwards. There is no confusion about what location 0 and location 1 mean. There is no confusion that a short is 2 bytes.But do you see the problem? The big-endian machine thinks s = 0x1234 and the little-endian machine thinks s = 0x3412. The same exact data gives two different numbers. Probably not a good thing.
Test - BIG / LITTLE Endianness of your system ...
FindLittleOrBig()
{
int i = 0x12345678;
if ( *(char *)&i == 0x12 )
printf(“Big endian\n”);
else if ( *(char *)&i == 0x78 )
printf(“Little endian\n”);
}

Another way to test
#include "stdio.h"
int main()
{
union {
short s;
char c[sizeof(short)];
} un;
un.s = 0x0102;
if(sizeof(short) == 2)
{
if(un.c[0] == 1 && un.c[1] == 2)
printf("big-endian\n");
else if(un.c[0] == 2 && un.c[1] == 1)
printf("little-endian\n");
else
printf("unknown\n");
}
else
{
printf("sizeof(short) = %d\n", sizeof(short));
}
return(0);
}

Wednesday, July 16, 2008

How to get to the command prompt by registry file add

Very frequently we need to create command prompt at a certain folder. Most users directly go to command prompt and then type out the entire pathname to get to the required folder.
Would it not be much easier to get to the command prompt by directly right-clicking on the folder?
Below is how you can do it. This is valid only for Win XP. Other operating systems have not been checked.

1. Create a text file wherever it is easy for you to access it.
2. Copy and past the following data into the file command.txt :

REGEDIT4
[HKEY_CLASSES_ROOT\Directory\shell\DosHere]
@="Command &Prompt Here"

[HKEY_CLASSES_ROOT\Directory\shell\DosHere\command]
@="C:\\Windows\\System32\\cmd.exe /k cd \"%1\""

[HKEY_CLASSES_ROOT\Drive\shell\DosHere]
@="Command &Prompt Here"

[HKEY_CLASSES_ROOT\Drive\shell\DosHere\command]
@="C:\\Windows\\System32\\cmd.exe /k cd \"%1\""

3. Save the file
4. Now rename the extension from a command.txt to a command.reg (registry type file). Go to DOS prompt and type C:\ren command.txt command.reg
5. Double clicking the file will pop up a dialog box saying "Are you sure you want to add the data to the registry".
6. Say yes and the data gets added into your windows registry.
7. Now any folder where you want a command prompt, it is as easy as right clicking on the folder and choosing "Command Prompt Here".

Simple as that....

Monday, July 7, 2008

Analyzing Core Dumps and Assert Debugging

#define ASSERT(x)
void assert(int expression);
If expression evaluates to 0 (false), then the expression, sourcecode filename, and line

number are sent to the standard error, and then calls the abort function.
Common error outputting is in the form:

Assertion failed: expression, file filename, line line-number

#define NDEBUG === > then the macro assert does nothing.

To enable core dumps for your current shell, use ulimit to set a maximal core dump size in megabytes.
For this example, we'll "limit" core dumps to 1 gigabyte:

gcc -g -o exe_name main.c
$ulimit -c 1024
$ls -als core

Analyzing Core Dumps
====================
$gdb ./exe_name ./core_filename

Thursday, July 3, 2008

Windows XP Commands ,Tips and Hacks

1. It boasts how long it can stay up. Whereas previous versions of Windows were coy about how long they went between boots, XP is positively proud of its stamina. Go to the Command Prompt in the Accessories menu from the All Programs start button option, and then type 'systeminfo'. The computer will produce a lot of useful info, including the uptime. If you want to keep these, type 'systeminfo > info.txt'. This creates a file called info.txt you can look at later with Notepad. (Professional Edition only).

2. You can delete files immediately, without having them move to the Recycle Bin first. Go to the Start menu, select Run... and type 'gpedit.msc'; then select User Configuration, Administrative Templates, Windows Components, Windows Explorer and find the Do not move deleted files to the Recycle Bin setting. Set it. Poking around in gpedit will reveal a great many interface and system options, but take care -- some may stop your computer behaving as you wish. (Professional Edition only).

3. You can lock your XP workstation with two clicks of the mouse. Create a new shortcut on your desktop using a right mouse click, and enter 'rundll32.exe user32.dll,LockWorkStation' in the location field. Give the shortcut a name you like. That's it -- just double click on it and your computer will be locked. And if that's not easy enough, Windows key + L will do the same.

4. XP hides some system software you might want to remove, such as Windows Messenger, but you can tickle it and make it disgorge everything. Using Notepad or Edit, edit the text file /windows/inf/sysoc.inf, search for the word 'hide' and remove it. You can then go to the Add or Remove Programs in the Control Panel, select Add/Remove Windows Components and there will be your prey, exposed and vulnerable.

5. For those skilled in the art of DOS batch files, XP has a number of interesting new commands. These include 'eventcreate' and 'eventtriggers' for creating and watching system events, 'typeperf' for monitoring performance of various subsystems, and 'schtasks' for handling scheduled tasks. As usual, typing the command name followed by /? will give a list of options -- they're all far too baroque to go into here.

6. XP has IP version 6 support -- the next generation of IP. Unfortunately this is more than your ISP has, so you can only experiment with this on your LAN. Type 'ipv6 install' into Run... (it's OK, it won't ruin your existing network setup) and then 'ipv6 /?' at the command line to find out more. If you don't know what IPv6 is, don't worry and don't bother.

7. You can at last get rid of tasks on the computer from the command line by using 'taskkill /pid' and the task number, or just 'tskill' and the process number. Find that out by typing 'tasklist', which will also tell you a lot about what's going on in your system.

8. XP will treat Zip files like folders, which is nice if you've got a fast machine. On slower machines, you can make XP leave zip files well alone by typing 'regsvr32 /u zipfldr.dll' at the command line. If you change your mind later, you can put things back as they were by typing 'regsvr32 zipfldr.dll'.

9. XP has ClearType -- Microsoft's anti-aliasing font display technology -- but doesn't have it enabled by default. It's well worth trying, especially if you were there for DOS and all those years of staring at a screen have given you the eyes of an astigmatic bat. To enable ClearType, right click on the desktop, select Properties, Appearance, Effects, select ClearType from the second drop-down menu and enable the selection. Expect best results on laptop displays. If you want to use ClearType on the Welcome login screen as well, set the registry entry HKEY_USERS/.DEFAULT/Control Panel/Desktop/FontSmoothingType to 2.

10. You can use Remote Assistance to help a friend who's using network address translation (NAT) on a home network, but not automatically. Get your pal to email you a Remote Assistance invitation and edit the file. Under the RCTICKET attribute will be a NAT IP address, like 192.168.1.10. Replace this with your chum's real IP address -- they can find this out by going to IPADDRESS -- and get them to make sure that they've got port 3389 open on their firewall and forwarded to the errant computer.

11. You can run a program as a different user without logging out and back in again. Right click the icon, select Run As... and enter the user name and password you want to use. This only applies for that run. The trick is particularly useful if you need to have administrative permissions to install a program, which many require. Note that you can have some fun by running programs multiple times on the same system as different users, but this can have unforeseen effects.

12. Windows XP can be very insistent about you checking for auto updates, registering a Passport, using Windows Messenger and so on. After a while, the nagging goes away, but if you feel you might slip the bonds of sanity before that point, run Regedit, go to HKEY_CURRENT_USER/Software/Microsoft/Windows/Current Version/Explorer/Advanced and create a DWORD value called EnableBalloonTips with a value of 0.

13. You can start up without needing to enter a user name or password. Select Run... from the start menu and type 'control userpasswords2', which will open the user accounts application. On the Users tab, clear the box for Users Must Enter A User Name And Password To Use This Computer, and click on OK. An Automatically Log On dialog box will appear; enter the user name and password for the account you want to use.

14. Internet Explorer 6 will automatically delete temporary files, but only if you tell it to. Start the browser, select Tools / Internet Options... and Advanced, go down to the Security area and check the box to Empty Temporary Internet Files folder when browser is closed.

15. XP comes with a free Network Activity Light, just in case you can't see the LEDs twinkle on your network card. Right click on My Network Places on the desktop, then select Properties. Right click on the description for your LAN or dial-up connection, select Properties, then check the Show icon in notification area when connected box. You'll now see a tiny network icon on the right of your task bar that glimmers nicely during network traffic.

16. The Start Menu can be leisurely when it decides to appear, but you can speed things along by changing the registry entry HKEY_CURRENT_USER/Control Panel/Desktop/MenuShowDelay from the default 400 to something a little snappier. Like 0.

17. You can rename loads of files at once in Windows Explorer. Highlight a set of files in a window, then right click on one and rename it. All the other files will be renamed to that name, with individual numbers in brackets to distinguish them. Also, in a folder you can arrange icons in alphabetised groups by View, Arrange Icon By... Show In Groups.

18. Windows Media Player will display the cover art for albums as it plays the tracks -- if it found the picture on the Internet when you copied the tracks from the CD. If it didn't, or if you have lots of pre-WMP music files, you can put your own copy of the cover art in the same directory as the tracks. Just call it folder.jpg and Windows Media Player will pick it up and display it.

19. Windows key + Break brings up the System Properties dialogue box; Windows key + D brings up the desktop; Windows key + Tab moves through the taskbar buttons.

Hope This gives you some Inside Info .. :)

Tuesday, July 1, 2008

USB Host Controller Driver Architecture

The universal serial bus (USB) driver architecture consists of a host computer, a physical bus, and one or more USB devices. The host computer contains two layers: an upper software layer, which includes USB device drivers, and a host controller hardware layer, also known as an adapter layer. The main responsibility of the host computer is to control data transfers to and from USB devices. USB devices are peripherals that use the USB electrical and data format specifications to communicate with the host computer. The physical bus is the set of USB cables that links the controller with the peripherals.

The following list shows the layers of the USB driver architecture:

  • Host Computer
  • Upper Software Layer with USB Devive drivers
  • Host Controller Layer or Adapter Layer
  • Physical Bus
  • USB

U USB Topology

The host computer is the root node of the USB tree and contains an implicit hub, called the root hub. A hub is a USB function that propagates USB data to one or more ports, thereby increasing the total number of functions that share the bus. A hub has one connection, called an upstream port, to higher levels of the USB tree. A hub can have any number of ports for connecting peripheral devices and other hubs. You can connect up to 127 devices, including hubs, to the host computer. Peripheral devices are always leaf nodes within a USB bus. However, as a matter of practical implementation, many USB peripheral devices have hubs integrated into them, so a user might not have to use separate USB hubs.

The following illustration shows a USB bus with several common peripherals connected.

In this example, the association of the mouse with the keyboard's internal hub and the speakers with the monitor's internal hub is arbitrary. You can connect the mouse to the monitor's internal hub, the modem to the keyboard's internal hub, and the speakers to the stand-alone hub in Tier 1 without affecting the system's functionality and without having to reconfigure software on the host computer. USB devices and their corresponding USB device drivers behave identically, regardless of the specific bus topology.

USB System Software


Universal serial bus (USB) system software consists of two layers, an upper layer of USB device drivers and a lower layer of USB functions. USB device drivers use the USB functions to establish connections to the devices they control and to configure and communicate with the devices. The lower layer of USB functions performs several interrelated tasks:

· Manage all communication between USB device drivers and the host computer's built-in USB root hub.

· Load and unload USB device drivers at the appropriate times.

· Translate data to and from the USB protocol's frame and packet formats.

· Perform generic configuration and status-related tasks by establishing communication with the generic endpoint on all USB devices.

The lower layer is itself composed of two parts, the upper USB driver module and the lower host controller driver (HCD) module. The USB driver module implements the high-level USB driver interface functions in terms of the functionality provided by the HCD module. USB device drivers use the USB driver interface functions to communicate with their peripherals. Use the functions that are provided by the USB driver to implement your USB device drivers.

The following illustration shows the two layers of software in the context of the host's USB hardware and a peripheral device.

During a data transfer, the flow of operation typically proceeds in the following sequence:

1. A USB device driver initiates transfers by using USB driver interface functions to issue requests to the USB driver module.

2. The USB driver module passes the requests to the HCD module.

3. The HCD module divides requests into individual transactions, based on its knowledge of the bus and on characteristics of the USB devices that are connected to the bus, and schedules these transactions over the bus.

4. The host controller hardware performs or completes the transactions.

All transactions on the bus originate from the host side; the peripherals are totally dependent


USB Device

Universal serial bus (USB) peripheral devices consist of one or more logical components, called interfaces, that implement the abilities of the devices. Although each interface provides a useful grouping of functionality, precisely what constitutes an interface is an implementation detail. For example, a USB mouse device could present one interface for horizontal-movement and vertical-movement information and a separate interface for left-button and right-button information. As another option, the device could present a single interface containing all of the information. Both are valid approaches, but each approach has implications for how the device driver must operate.

Associated with each interface is a set of endpoints. Endpoints are the ultimate producers or consumers of data that is transmitted across the bus. All USB devices have a special endpoint, known as endpoint 0, which supports the generic USB status and configuration protocol.

USB device drivers establish logical communication channels, called pipes, to the various endpoints on a USB device. A pipe is a software association between a USB device driver and an endpoint. Pipes can be thought of as communication channels that use function calls to the USB system software to communicate with their associated endpoints. The characteristics of a pipe, such as the direction of communication and the supported transfer type, are determined by the endpoint characteristics, which in turn are indicated in the endpoint descriptor structure obtained from the device.

The bus interface hardware on a USB device is responsible for the transmission and reception of USB-structured data. The logical USB device corresponding to a physical USB device consists of USB abstraction entities, such as the device endpoints and their corresponding pipes.

The USB system loads the driver for every interface that is specified by a multiple-interface USB device. You can still load one driver for all the interfaces in this device through the registry.

Sunday, June 29, 2008

Debugging with GDB ( Stack and frames )

A debugger lets you pause a program, examine and change variables, and step through code. Spend a few hours to learn one so you can avoid dozens of hours of frustration in the future.

Getting Started: Starting and Stopping

  • gcc -g myprogram.c
    • Compiles myprogram.c with the debugging option (-g). You still get an a.out, but it contains debugging information that lets you use variables and function names inside GDB, rather than raw memory locations (not fun).
  • gdb a.out
    • Opens GDB with file a.out, but does not run the program. You’ll see a prompt (gdb) - all examples are from this prompt.
  • r
  • r arg1 arg2
  • r <>
    • Three ways to run “a.out”, loaded previously. You can run it directly (r), pass arguments (r arg1 arg2), or feed in a file. You will usually set breakpoints before running.
  • help
  • h breakpoints
    • List help topics (help) or get help on a specific topic (h breakpoints). GDB is well-documented.
  • q - Quit GDB

Stepping Through Code

Stepping lets you trace the path of your program, and zero in on the code that is crashing or returning invalid input.

  • l
  • l 50
  • l myfunction
    • List 10 lines of source code for current line (l), a specific line (l 50), or for a function (l myfunction).
  • next
    • Run program until next line, then pause. If the current line is a function, execute the entire function, then pause. Next is good for walking through your code quickly.
  • step
    • Run the next instruction, not line. If the current instructions is setting a variable, it is the same as next. If it’s a function, it will jump into the function, execute the first statement, then pause. Step is good for diving into the details of your code.
  • finish
    • Finish executing the current function, then pause (also called step out). Useful if you accidentally stepped into a function.

Breakpoints and Watchpoints

Breakpoints are one of the keys to debugging. They pause (break) a program when it reaches a certain location. You can examine and change variables, then resume execution. This is helpful when seeing why certain inputs fail, or testing inputs.

  • break 45
  • break myfunction
    • Set a breakpoint at line 45, or at myfunction. The program will pause when it reaches the breakpoint.
  • watch x == 3
    • Set a watchpoint, which pauses the program when a condition changes (when x == 3 changes). Watchpoints are great for certain inputs (myPtr != NULL) without having to break on every function call.
  • continue
    • Resume execution after being paused by a breakpoint/watchpoint. The program will continue until it hits the next breakpoint/watchpoint.
  • delete N
    • Delete breakpoint N (breakpoints are numbered when created).

Setting Variables and Calling Functions

Viewing and changing variables at run-time is a huge part of debugging. Try giving functions invalid inputs or running other test cases to find the root of problems. Typically, you will view/set variables when the program is paused.

  • print x
    • Print current value of variable x. Being able to use the original variable names is why the (-g) flag is needed; programs compiled regularly have this information removed.
  • set x = 3
  • set x = y
    • Set x to a set value (3) or to another variable (y)
  • call myfunction()
  • call myotherfunction(x)
  • call strlen(mystring)
    • Call user-defined or system functions. This is extremely useful, but beware calling buggy functions.
  • display x
  • undisplay x
    • Constantly display value of variable x, which is shown after every step or pause. Useful if you are constantly checking for a certain value. Use undisplay to remove the constant display.

Backtrace and Changing Frames

The stack is a list of the current function calls - it shows you where you are in the program. A frame stores the details of a single function call, such as the arguments.

bt

Backtrace, aka print the current function stack to show where you are in the current program. If main calls function a(), which calls b(), which calls c(), the backtrace is

<= current location
b
a
main
  • up
  • down
    • Move to the next frame up or down in the function stack. If you are in c, you can move to b or a to examine local variables.
  • return
    • Return from current function.

Crashes and Core Dumps

A “core dump” is a snapshot of memory at the instant the program crashed, typically saved in a file called “core”. GDB can read the core dump and give you the line number of the crash, the arguments that were passed, and more. This is very helpful, but remember to compile with (-g) or the core dump will be difficult to debug.

  • gdb myprogram core
    • Debug myprogram with “core” as the core dump file.
  • bt
    • Print the backtrace (function stack) at the point of the crash. Examine variables using the techniques above.
This is a quick guide, more information here:  

Saturday, May 31, 2008

BSP ( Board Support Package )

BSP (Board Support Package) is low-level software that supports an OS for a specific board/processor and is sandwiched between the hardware and OS (and BSP does a lot more things also that we would discuss in time). Since a BSP is particularly targeted for a specific CPU/board, there exist many a variants. But typically a BSP consists of the following:

1> Boot Loader

2> OS Adaptation Layer (this is my term; most people call it as OEM Adaptation Layer) or OAL

3> Device Drivers (Kernel level)

4> Image configuration files

A system can be broadly viewed like this at the low-level:

1> Boot Loader:

The main purpose of a boot-loader is to initialize the target device(including SRAM, clocks, PLLs etc), place the run-time image into memory and then boot the run-time image on the target device (i.e. jump to the OS startup routine). An assembly file called boot.S contains a minimal set of code for transferring control from the processor’s reset location to the start of the application (i.e. the run-time image).

During the linking process, a jump instruction is mapped to the reset vector (i.e. the processor’s reset location, i.e. the location at which the control goes first once the processor is powered ON) with a label that marks the run-time image’s entry point. The reset location is board dependent and is fixed for a particular processor. This jump instruction is the first boot instruction that gets executed.


The boot-loader can obtain the run-time image in different ways, including loading it over a cabled connection (Ethernet, USB, serial COM ports etc), or from local storage device (flash/hard-disk). A boot-loader should reside in a non-volatile memory such as flash.

2> OAL:

OAL is linked with kernel libraries to create kernel executable file. The OAL facilitates communication between OS and the target device and includes code to handle interrupts, timers, power management, bus abstraction, generic I/O control codes (IOCTLs), and so on. The OAL is physically a part of the kernel image.

Creating the OAL is one of the more complex tasks in the process of getting an OS to run on a new hardware platform. In general, the easiest way to create an OAL is to copy the OAL implementation from a working OS design, and then modify it to suit the specific requirements of your hardware platform (ctrl-c + ctrl-v!! J).

3> Device Driver:

Device drivers in an embedded system is too a huge topic to cover at this level.

But remember that when you execute a device driver in kernel mode (or any code for that matter in kernel mode), you must have access to the physical memory, and the BSP should account for that (by virtual-physical memory mapping).

4> Image Configuration files:

These are mostly header files, and contain all the important board-specific parameters and data that BSP might require. These include:

(i) Initial address space or kernel space: The exact interpretation of this field is architecture-dependent.

a. In some cases, it describes the address space which must be established in the hardware when entering the microkernel.

b. In other cases, it describes the address space which must be established by the microkernel's memory management module.

c. Some architecture does not require it at all (for example when there is no MMU).

(ii) Banks: System image memory bank (number of banks, size of each bank, starting address within the initial address space etc)

(iii) Binaries: Points to the absolute executable binary involved in the system, such as bootconf (the main role of bootconf is to hold the structure containing the configuration parameters), microkernel, or a driver.

(iv) Heap and Stack: You people know more about it than me!

(v) There are a lot other parameters which get changed dynamically,.

Wednesday, April 30, 2008

VIRTUAL REALITY

Virtual functions are a key feature of C++. Via dynamic binding( Late Binding ), they provide a powerful mechanism to change the semantics of a function at run time. To support the virtual function mechanism, different schema's have been adopted. I shall discuss the method used by Microsoft Visual C++ compiler (Model proposed by Martin O' Riordan).
Whenever a class declares a virtual function or is derived directly or indirectly from a class which declares a virtual function, the complier adds an extra hidden member variable which points to the virtual table. A virtual table is nothing but an array of pointers to the virtual functions. The entries in the virtual table are changed at run time to point to the correct function.Consider the following class :
    class Base
    {
    public :
    Base() { }
    ~Base() { }
    virtual void VirtualFunc() { cout << "Base::VirtualFunc()" << endl ; }

    };

    Base defines a trivial virtual function VirtualFunc(). Let us derive a new class 'Derived' from 'Base'.

      class Derived : public Base
      {
      public :
      Derived() { }
      ~CDerived() { }
      void VirtualFunc() { cout << "Derived::VirtualFunc()" << endl ; }

      };

As you can see, Derived has overriden VirtualFunc(). When we create an instance of Derived, typical object layout is shown below :

0064FDE0 84 30 41 00 E8 FD 64 „0A.èýd
0064FDE7 00 54 30 41 00 28 FE .T0A.(þ
0064FDEE 64 00 CF 10 40 00 01 d.Ï.@..
0064FDF5 00 00 00 38 FE 64 00 ...8þd.
0064FDFC D9 27 40 00 01 00 00 Ù'@....
0064FE03 00 48 02 76 00 98 02 .H.v.˜.
0064FE0A 76 00 68 F1 59 81 48 v.hñY.H

The first four bytes are pointer to the virtual table. The virtual table itself contains pointers to the virtual functions of the object. In our case, it is a pointer to VirtualFunc().

Memory layout of the virtual table is :

00413084 32 10 40 00 FF FF FF 2.@.ÿÿÿ
0041308B FF DE 2D 40 00 EB 2D ÿÞ-@.ë-
00413092 40 00 00 00 00 00 FF @.....ÿ
00413099 FF FF FF 00 00 00 00 ÿÿÿ....

The first four bytes are pointer to VirtualFunc().

With this information, we can tweak an object and make it do weird things !! (just for fun)
Let us change the virtual table pointer and point it to our own table !!!.

    ////////////////////////////////////////// Modify.cpp ///////////////////////////////////////////////////
    #include "iostream.h"
    #include "memory.h"

    //Pointer to a function returning void
    typedef void (*PFN)();

    typedef struct
    {
    PFN Fn;
    } VTable;

    //The function which will replace VirtualFunc
    void ModifyFunc() { cout << " Modified the vitual table !!!" << endl ; }

    int main()
    {
    Derived DerivedObj;

    Base *pBase = &DerivedObj;

    //Create our own virtual table
    VTable MyOwnTable;

    //Point Fn to ModifyFunc
    MyOwnTable.Fn = ModifyFunc;

    //Holder for pointer to virtual table
    VTable *pVTable = &MyOwnTable;

    //Modify the virtual table pointer by changing the first 4 bytes (assuming a long holds a pointer)
    memcpy(&DerivedObj, &pVTable , sizeof(long));

    //Call the virtual function
    pBase->VirtualFunc();

    //Strange !! ModifyFunc() is called ... enjoy playing :)
    return 0;
    }

A similar though slightly complex technique is used for multiple inheritance and virtual inheritance. Might as well write about them sometime....

Thursday, April 24, 2008

FLAVOURED RTOS

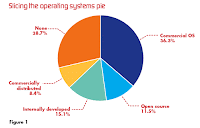
  • Operating systems. Nothing cuts to the heart of a development project like the choice of OS. Whether it's a tiny scheduler or kernel, an open-source distribution, a tightly wound real-time operating system, a fully featured commercial RTOS, or no OS at all, it drives all downstream software decisions and many hardware decisions as well. There isn't much that all embedded systems have in common but some clear trends is revealed nonetheless.First off, more than a quarter of embedded systems now in development won't have an OS at all. Predictably ,larger organizations tend to use operating systems in their products more often than smaller companies do.
It's easy to think of many products, such as thermostats or microwave ovens, that might not need an OS so this isn't overly surprising. It's frustrating for operating-system vendors, though, who'll have a tough time converting that large portion of the market into potential candidates for their wares.
In our 2005 , only 44% of respondents were using a commercial OS, so commercial OS usage has grown significantly. Moreover, that growth is coming at the expense of in-house code.
Both commercial and noncommercial distributions of open-source OSes (mostly Linux) has declined sharply from last year.

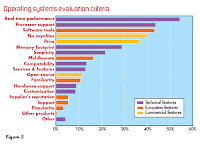
  • For most, real-time performance is the big issue. Right behind is processor compatibility. In other words, we can't use an OS that hasn't been ported to our preferred microprocessor, microcontroller, or DSP. That makes sense; compatibility is a pass/fail criterion for most developers.

  • So it all comes down to this, the all-important ranking of commercial OSes. Among commercial embedded operating systems, Wind River's VxWorks was the undisputed leader, as shown in Figure.

Tied for second place are the Microsoft twins, Windows XP for Embedded and Windows CE (there were separated by one vote). In a predictable reversal, WinXP and WinCE were most popular where VxWorks was weakest: industrial and computer-related applications. XPe was especially strong in manufacturing industries, where VxWorks also made a good showing.

In the number four spot we have Texas Instruments' DSP/BIOS, a product with obvious hardware ties. That's followed by Red Hat's Linux, the first of the many Linux variants to make the list.

  • The chart shows the delta between the "would consider" responses and the "using now" responses from the previous graph. In brief, the winners lose and the losers win. How is that possible and what does it all mean?
First, the responses don't necessarily mean that VxWorks users are unhappy with their current RTOS and are ready to jump to (for example) LynxOS or Wind River's Platform NE Linux.
What we can say with certainty is that about 8% fewer people said they'd consider VxWorks compared with the number using it now. Whether or not those are the same people is impossible to tell.Reflecting a kind of Zen balance, almost all of the middle and low scorers gained share of mind in roughly equal proportion to the share lost by the big players. Whether accidentally or by design, the numbers reflect a zero-sum game.

The overall picture is therefore good for commercial OS suppliers. As the number and type of embedded systems increase, so will the total available market.And although open-source operating systems are well and truly established, with one-fifth of developers using one now, their growth seems to have flattened.What's certain is that the variety of embedded systems—and the operating systems that serve them—will continue to flourish.

Thursday, April 3, 2008

Grains of Linux


More Useful Info in next session ....

Semi Industry Prediction

Happy New Year! 2008 is just beginning to unfold in the electronics industry and there is already uncertainty in the air based on recent industry data.
Industry forecasters seem to have different opinions about the overall outlook for the semiconductor and IC-equipment markets in 2008 and beyond.